My newest project involves reincarnating a very old (1998) cd duplicating robot. It is a DTP-1000 that was originally SCSI only. Due to the fates smiling down upon me I was able to pick it up on ebay for $11. I bought it intending to put an arduino in the place of the control board and probably have to do a lot of reverse engineering. The next day I happened upon this site where, amazingly someone has already opened one of these up and has instructions on how to enable serial control! I still am in awe of how lucky I got and really happy that DarkBane dropped all of that knowledge on the world.
There are a lot of pics below, since that was the one thing I could do to add to the fine directions DarkBane has already provided. Another thing is that in his command set he has two typos. I will quote his post after the pix and note the command set in bold.


As promised, here is DarkBane’s post from DBpoweramp forums
Hi
Sorry for the delay, here’s a quick and incomplete guide I wrote to help you and
everybody else that has a DTP4000:Experimental SERIAL port control for SCSI DTP1000/4000
Written by Daevon (ilgrancaliffo -at- hotmail.com)
Version 0.2 18 Feb 20091) The HARDWARE
Since the SCSI DTP1000/4000 use a proprietary driver to send commands to the control board and since this driver won’t work on machines other than Win 9x, NT4 and Windows 2000, the solutions to continue using it on newer machines are either
– Putting up a windows 2000 machine with a SCSI interface and use the rimage drivers
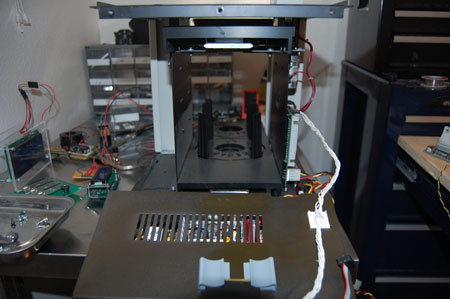
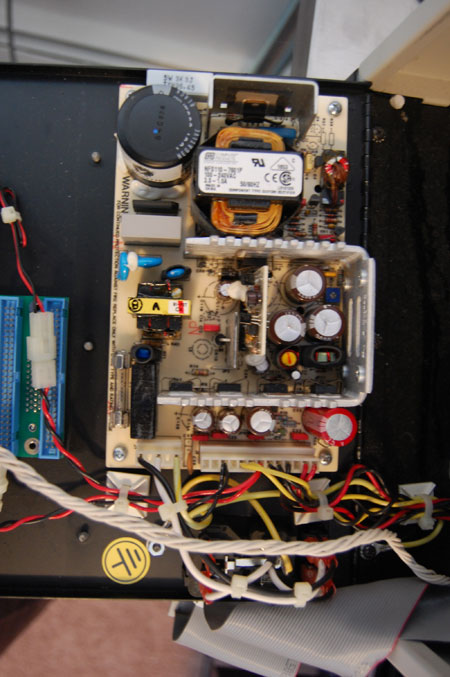
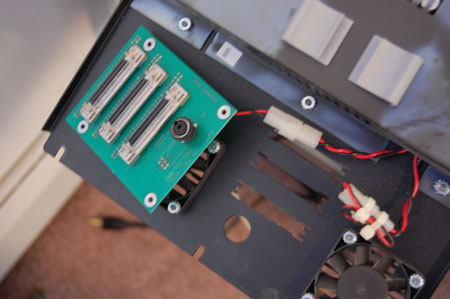
– connect the serial debug connector on the mainboard to a serial-equipped pc (any OS) and use the drives standalone (either the native scsi ones with a proper controller or newer, even dvd, units, connected with ESATA (preferred), or USB/Firewire to ATA/SATA. This is the way I’m going to cover.To access the DTP main board you have to slightly unscrew the two screws on the top-right of the unit. Remove the side panel. You’ll see the board in the lower left corner, with the scsi cable connected to it.
Looking at the main board, at the top there’s an unused 5 pin connector named J13 that looks like this:
J13 5_/////_1
If you’re lucky and it is still there, you can re-use the printer cable connector: it goes from the back of the unit (near the 3 scsi ports) to the lower part of the mainboards. It has 6 pins, but it will fit nicely on the serial one.. of course you’ll need some basic soldering skill.
Connect the pins this way:
J13 Connector-> Female DB9
1————–>2
2————–>3
3————–>4
4————–>Not Connected
5————–>5Now you should have a working serial connection.
2) THE SOFTWARE
Once you have hooked it, open your favorite terminal program (I suggest PUTTY) and configure it to the appropriate COM port with the following settings:COMx (The serial port your DTP is connected to)
19200 Speed
8 Bits
N No parity
1 Bit stop
P Hardware parity or no parity at all.Power on your unit, you should read some (brief) test, like:
Firmware revision 4.0A
The basic commands are:
MD —-> Move Picker all the way down
MDxxx -> where xxx are hex values from 1 to 2000 (dec 1 to 8192) moves the picker downwards by the specified amount eg. MD88C
MU —-> same as MD, but upwards.
MUxxx -> same as MDxxx, but upwards.
MH —-> Moves the picker to the topmost (home) position
OI —-> Open lower drawer (ie, switch to the second position)
CI —-> Close lower drawer
OR —-> Open Reject drawer
CR —-> Close Reject drawer
P —–> Drops the CD (WARNING: ISSUE A “R” IMMEDIATELY AFTERWARDS! See notes)
R —–> Returns the picker hand to the normal position(If you happen to discover some other command,like the one that senses it the picker has a disk, please let me know!)
EXAMPLE: To pick up a cd, simply issue an MD command,wait for the arm to reach the lowemost position, then issue an MU200. Your picker should have a cd now!
*blooper**blooper**blooper*You need to wait for each command to complete before issuing the following one, or it will get ignored. Since there are no return codes on the SCSI units, you simply have to look at the unit and wait for the issued command to complete
EXAMPLE: Now try to issue an MH, followed by an OR, P, R, DR.
If everything is working correctly, the CD it has picked before will be dropped in the reject drawer and the drawer will close.3) MISC FINDINGS
a)The range of the picker seems to be around 6800 (1A90 hex). IE: It will go from 0 (home) to touching the lower cassette if you issue an:MD1A90
b)The picker is not very precise at all.
ie: if you input:
MDFF
MDFF
MDFF
MDFF
MDFF
MDFF
MDFF
MDFF
MU800
(wich means: go down eight times by 256, then go up by 2048, wich is exactly 256×8) it WON’T return to the same position it started in. It will be close enough tho.4) THANKS to:
Bhoar (Brendan) at the dbpoweramp forum for the IMMENSE help he gave me: without him this guide would not have been possible.The guys (and gals!) at the dbpoweramp forum for sharing their findings and wisdom
This guide is an early attemp at reverting an old DTP4000 to functionality. It most likely full of errors, mistakes, misconceptions and so on… please bear with me and if you have more detailed infos.. share them!
Btw, I take absolutely no responsability if your DTP makes an horrible death based on what you did read here..
Now Have fun with your DTP unit!
-Daevon
Now I have had a very similar experience to that posted above. I was able to connect via my mac and a usb to serial adapter
using the nice app serial tools. If you are having trouble, double and triple check the wiring and the serial settings, and make sure that you have the usb->serial adapter’s drivers installed.
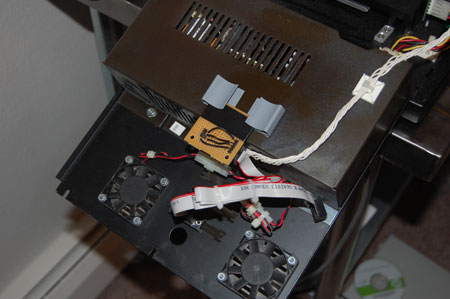
I don’t have the new drives fully installed yet because I have been having a bit of trouble with my current one’s ability to eject. I’m still looking into that. One other thing that I have run into is that it seems the machine shuts down the serial port after releasing a disc. Every Time. That will not work.
In other words – it’s still unfinished, but I have had it for less than 12 hours now, so it has come amazingly far! Stay tuned for more progress.
Great work! I did something similar with an Orbit CD duplicator. I did go down the Arduino path, and now have a USB controlled DVD burner with robotics attached (great for ripping CD collections).
I’m very impressed with the work preform on CD duplicator. I simply ask this one question for now. If you have the CD printer will the unit still work in conjuction with the new upgrades of the units.
Hey Jeffery,
It certainly could, but I will not be building it to work with a printer as I have no need for a cd printer.
Hi Olskool, how do You organize the unit? I developed my own software related to Nero. Interested? Send a mail to madtax @hotmail.de.
MadTax
White cable is for serial control. Before that it was used to control printer. Do you know how to make printer control cable? I bought this unit without printer cable inside (it was used to control RS-232).
I have a DTP4000 that has a different command set. This DTP5000 is firewire. It als has the same SCSI interface board, but it’s unused (there’s no ribbon cable attached for SCSI drives)–all drives are firewire and each has an individual firewire-to-IDE interface board on the left-hand side of the chassis (each interface is daisy-chaned on the firewire).
The commands that differ are the MOVE commands as well as the open/close commands. The firmware version is 4.05, dated October 18, 2001.
I’m curious if anyone has reverse-engineered this versions commands. I’ve done most, with the exception of the setting/alignment commands for it’s NVRAM-save positions for the picker stop positions for the printer, drives and hoppers.
(BTW, the firewire already comes with the serial cable connected to a DB9 on the back of the unit).
Just a follow-up on my previous post… I reverse-engineered the DTP4000/firewire commands overnight. I have written up programming for all the unit operations now, including “learning” picker positions. There are still a couple of variables/status elements retured from the “S” command that I am unsure of their use. If anyone knows of another’s breakdown of the protocol, I’d still be interested in that information. Meanwhile, I have the robotics fully operational and am pulling together the programming to generate the disc images and label images and produce media in an automated workflow.
Cheers,
-scott