I really enjoy building mechanical movements, and I am terrible at it. It is really difficult to build things that move without relying on expensive pre-built mechanisms. Thus I am always looking for cheap ways to design and build cogs, gears, and sprockets.
For gears it is tough to beat the online wooden gear generator at woodgears.ca. It lets you specify size and number of gears, and also lets you see how they mesh and tweak a bunch of variables. I usually print these to pdf and then import them as vector to illustrator. With this site you can build any number of compatible gears. They have rather large teeth because they are meant to be cut out of wood with a bandsaw, but they will work very well for low-precision work. There is also an inkscape plugin that generates gears as described here by MAKE.
One note on importing all of these files into illustrator. Illustrator has strange import prefs, and if you import a dxf that is in mm, and your preferences are in inches, centimeters, or anything else, then it will scale your drawing on import. Be careful. This is an easy way to mess up at the very first step.
Timing belt cogs are another deal entirely. There isn’t an online generator. There are a few python scripts that purport to build cogs, but they never seem to work right. One other way to do it is with blender and a plugin, but then you end up doing more 3d modeling than cutting.
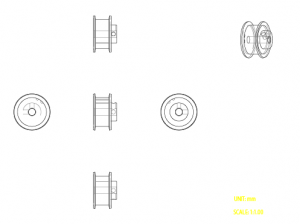
To build one in illustrator you will need to know the belt you plan on using and the number of teeth you want the cog to have. You will also want to go to sdp-si and download an example any cog that uses your belt pitch. Set your units to mm in illustrator>preferences>units. Grab the dxf of that cog and open it up in illustrator.
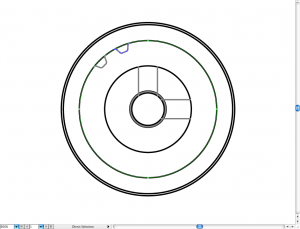
More than likely you will see something similar to the image below. It has two example teeth showing the tooth spacing, but the entire cog isn’t drawn out as a time saving measure.


If this is the actual cog that you want, then here is how to replicate out the teeth you are missing. Draw a box around one tooth and a part of the circle that the tooth is on using the white arrow while holding down the option key. This will select the full circle and the entire tooth.

Now hit R to switch to the rotate tool. Click and hold on the upper right point in the tooth. While still holding down the mouse button press and hold the option key. Rotate the tooth over until it snaps on top of the next tooth over. Let go of the mouse button and then the option key.
In that last step what you did was to duplicate and rotate both the circle and the cog by one tooth. All that you need to do now is to repeat that step until your cog is complete. By hitting command-d you can repeat the last step. Do that until your cog is complete!
You are two steps away from being finished. In that last operation you inadvertently duplicated the outer circle for each tooth you made. That can cause some problems when you are laser cutting because the laser may try to cut the same circle multiple times. Using the white arrow and holding down option, drag a box around a piece of the circle. Only draw the box over the circle. Now hold shift and option, and click once on a point on the circle. Hit delete. What that just did was select all of the circles, de-select one, and then delete them.
The final step is optional. The cog will cut as-is, but the teeth are separate from the ring. If you want to clean it up, then delete the one remaining circle, select everything and ungroup it. Then select two adjacent teeth and hit command-j. This will draw a line between them. This can be a serious pain if you have a big cog, but it does make it nicer to work with and cut.
If the cog you downloaded isn’t the cog you want to end up with, then you need to find the diameter of the ring that the teeth are on. You can measure it in illustrator. Divide the diameter by the number of teeth on the example cog. This gives you the ratio you need in order to find the diameter of your desired cog. Multiply that ratio by your desired number of teeth to get your circle size.
In my example from above: 25.367mm/16 teeth = 1.585mm/tooth
Lets say I want a 20 tooth cog. 20teeth * 1.585mm/tooth = 31.7mm
In illustrator select the circle tool and click once in your artboard. Enter your size into both of the fields in the popup and hit enter.

This is the only hard part. Find the tooth that is closest to vertical or horizontal. Select that tooth and option drag it from the example to your circle. Spend some time aligning it to the circle so that both ends are on the circle. Try not to rotate or change your tooth profile. That will effect how your belt fits the cog.

This is your last bit of math. Divide 360 by your number of teeth.
In my example 360 degrees / 20 teeth = 18 degrees/tooth
Select your circle and your tooth. Copy using command-v and paste in front using command-f. Now double click on the rotate tool. This will bring up a popup. Enter in your degrees per tooth in the box.

At this point you should be in exactly the same position as the example above. Follow those directions to quickly duplicate the rest of your teeth out.
As far as roller chain / bike chain
 I downloaded an example of a #40 pitch roller chain sprocket from reid supply. You should be able to duplicate out the teeth in exactly the same manner. I also found this pc-only software called sprocketeer 2.0 which will generate any size sprockets for you, but I haven’t tested it.
I think that all of these could easily be laser cut out of the right plastic, and possibly even wood. The roller chain may need to be reserved to light duty work, but if you keep the number of teeth high enough then it might not be enough pressure to tear off a tooth.


I found and used some other custom gear generators for inkscape that work really well (though still don’t produce chain cogs correctly). I saved as SVG and opened in Illustrator (CS5) and it seems to keep the scaling consistent.
Better Gears with spokes, holes and markings etc: http://www.cnc-club.ru/forum/viewtopic.php?f=33&t=434#p2500
And crazy gears that somehow manage to work: http://www.cnc-club.ru/forum/viewtopic.php?f=33&t=433
Both are in russian, but Google translate worked well…
I make a patern brush of the tooth then aply it to a circle. Takes 5mins for the hole thing.