Yesterday I discovered that looking at the list of TGIBOEJ hopefuls is a great way to find new geeky-project blogs. There are a lot of flickr and twitter links, but there are also a lot of other interesting links. It’s good to hear that there are plenty of other people tinkering away in their basements and garages!
The Great Internet Migratory Box of Electronics Junk (or TGIMBOEJ to his friends)
I put myself on a list over at tgimboej.org to try to get a big box of junk to show up at my door! I’m super excited about the idea, because it combines my love of looking at geeky stuff with a strict one in / one out policy. It’ll be cool to swap some stuff I don’t know how to use (but have still somehow acquired a few of) for something I’m more interested in learning.
Looking at all of the photos posted all over the nets it seems like there is a huge variety of stuff out there circulating in the 25(!) different boxes! I hope someone deems me suitable – I’d love to check one out!
Removing the auto reset in Bare Bones Board Arduino
I’m currently working on a project that requires the Arduino to accept serial input from my mac. This would ordinarily be fine, but the auto-reset function means that the arduino resets whenever I send it data, and then it forgets the data!
I emailed Paul at Modern Device company to ask if there was an easy way to remove the auto rest function. Luckily there is! He said that the capacitor closest to the reset button is the one responsible. To remove auto reset you can remove the cap, cut the trace above or below the cap, or even remove the dtr line from the ftdi cable!
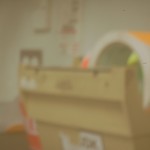
Here is a shot showing the assembled board. The cap is the blue guy poking out from behind the reset button.

Continue reading “Removing the auto reset in Bare Bones Board Arduino”
Just a tease
Here’s my newest project. It’s not yet ready to drop, but I’ll give you a lil taste to see if you can figure it out.


Freeduino Bare Bones Board Build (w/Macro shots!)
Last night I built two Freeduino Bare Bones Boards. I had two kits. One was from Moderndevice, and one was from MAKE. They were essentially the same kit, but different versions. There was one resistor difference I believe. The first kit took me quite a while to put together – probably about an hour. The second kit took about half of that. They were really quite straightforward. Put the parts in in the order they suggest and solder them up. You could even put them in in the wrong order – it would just make holding them in the board while you flip it over harder.
There were two sticking points in the instructions – (1) they say you need 4 of the small caps and they give you 5. You really need all five. (2) for some reason I read the debugging instructions at the end to say “troubleshoot if the light doesn’t turn off” as opposed to “if the light doesn’t turn on”

Continue reading “Freeduino Bare Bones Board Build (w/Macro shots!)”
Print contact sheets / thumbnails from video footage
This is a task I don’t like doing, but it is certainly useful if you have a lot of footage to sort through and not everyone is very technically inclined. It allows you to print a contact sheet from every x frames/seconds/minutes of a video file. That helps when you are looking for a specific shot in a bunch of reels, and it helps to very quickly show an art director what the footage you have looks like.
You’ll need either Quicktime or FCP, and Photoshop for this.
1) open your video file
2a) in quicktime hit export / movie to image sequence. Select “advanced options” and put in a frames per second number. If you put in 1 then you will still end up with 60 frames per minute! Luckily Quicktime will let us deal with decimals here. A value of .016 will give you around one frame per minute and usually works out well.

Continue reading “Print contact sheets / thumbnails from video footage”
Nuclear Missile Silo
a few weeks ago I got the opportunity to go check out a nuclear missile silo in the area that had been decommissioned and converted into a private residence. The owner’s name is Alex and he’s nothing like what you would expect (considering he owns a nuclear missile silo.) His website is siloboy.com and is totally worth checking out. Below are my pix. I’m not overly into the military history of it all, but I was still really impressed by its gigantic scale! This guy takes the classic geek’s desire for big toys to a whole new level!

Macro Tube!
I juts got a macro tube in the mail. It’s basically a dumb (ie you need to be on full manual mode-no metering or AF) piece of aluminum that moves the lens further away from the camera body. Doing so it decreases the minimum focal point.
Basically it means you can get really tight up on stuff and shoot close ups. Here are a few test shots


The macro tube has 3 different sized rings that thread into one another. That way you can roughly control the distance between the lens and the camera. The three shots are taken with the three rings on. Here’s a photo (ripped from deal extreme)
 [/caption]
USB Pumpkin light
So my girlfriend really loves halloween, and I love her, so I made her a tiny jack-o-lantern with a usb light. Super simple, I just cut an old usb cable up, pulled out the red and black wires, used a LED resistor calculator (usb provided 5v) Then I soldered in the resistor, heat shrunk it all up, and plugged ‘er in!
8 tips for Time lapse photography
Here’s a few things I have learned while sitting in fields waiting for my camera to finish working for me.
8 tips for shooting SLR time lapses
1) Put your camera on full manual – otherwise the still will flicker from one to the next.
2) Try to pick objects that are still, or are far away enough that they won’t be overly distracting (trees are great in the background, but tend to look bad in the foreground because they move so much.)
3) Set your camera to a fixed iso – mine was on auto iso (even in manual mode) and it took me a while to really figure that out.
4) Sometimes you will have to make concessions for the brightness / amount of motion blur issue. Either get more light, a faster lens, or a more realistic view of what is possible.
5) Set your camera to be as energy efficient as possible. Turn the auto preview off, and turn the auto focus off (after focusing) It is uncanny how much power holding the mirror up takes. If you are planning on shooting all night you’re going to need to be running efficient.