Kegerator continues!

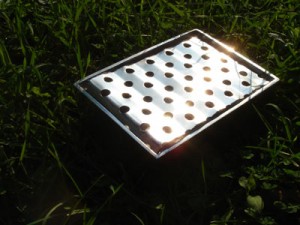
In my quest for beer-on-tap 24-7 I have been building a kegerator for my house. Soon I discovered I needed a drip tray to keep the floor from rotting through (did someone say firepole?!?!) Not wanting to pay almost $60 for one like this one I set out to make one. I found a aluminum tray from a toaster, and a cheap metal box from target. Put them together, and we’re off to the races! These are the two pieces.

kegorator drip tray DIY

This is the toaster tray cut up but not bent

This is the tray cut, bent, and dropped into the box. I’m pretty happy, considering it cost $1.68

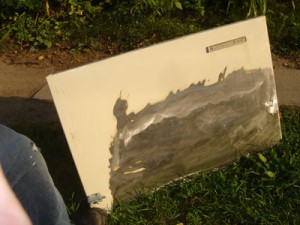
This is my attempt at making a counterfeit Sub Zero fridge. Yes that’s right! I took an angle grinder to the fridge! Now it’s bare metal! We’ll have to see how long the well oiled metal can resist rusting, and how long I can resist not steel wool-ing it to get the rust off. We’ll have to see about a lot of things. Until then I have 1/2 of a sub zero kegerator!

Fire in the hole!

My buddy Jay and I put together about 5 gallons of what-is-soon-to-be red ale.


Here’s a couple pictures of the process


Yeast rehydrating
Yeast rehydrating


Mmmmmm…. yeasty!


Tools ‘o’ the trade


Chillin out the load in the bathtub. This took at least an hour to get down to the pitching temperature. I need an immersion chiller REALLY BADLY

automation saved my life!

I’m a big fan of sitting back and watching my computer do mindless things for me. Applescript and photoshop actions are two big things on my list. (Sorry windows users, you’ll have to find some other kind of “glue”)


I just set up a workflow for posting pix that makes me pretty dang happy. I have a droplet made out of photoshop that saves all of my images to a folder on my desktop. It performs an action that converts them all to 300×400 and “saves for web” jpeg medium.


Next up I have an applescript app that uploads any files I drop onto it to my images folder via ftp.


This is what the script looks like.

on open doc
tell application “Fetch”
activate
make new transfer window at beginning with properties {hostname:”ftp.youraddress.com”, username:”username”, password:”password”}
open remote item “directory/to/your/html/image”
put into transfer window “ftp.youraddress.com” item doc
close window “ftp.youraddress.com — image”
end tell
end open

That’s about it. It saves me tons of time, and makes it less of a drag to put pix up, and that probably makes for a more readable blog.


In the future I’m thinking about making part of the applescript generate the code I need in order to post it. Yet another 3 buttons saved per photo. This wysisyg stuff can get real old some times…


I’m also gonna whip up a fetch script to upload videos, and a sorenson squeeze droplet to do auto compressing for me.


Maybe i’ll go so far as to make the folder that photoshop saves to hooked up with a folder action, so I can save a step.

Bearings and Beer….hmmmm….. Beerings?

So here are the fruits of my weekend.
These are the slide bearings for my CNC router. They’re made up of skate bearings, and angle aluminum. A really simple concept that makes my life simpler.


you can see my new Keg-o-rator here. It’s almost a perfect fit in this closet, with just enough room left to to fit all of my beer brewing stuff! Oh yeah, and an iron too…


Here is a closeup of the tap handle. Does anyone have any cool ideas for how to fabricate a cool drip tray? So far I’m coming up blank.


It just occurred to me how much I anthropomorphize my inventions/creations. that’s kind of weird. I guess having more unfinished projects than fingers is weird too.. oh well…


I cut the hole for the tap the worst possible way ever. I used a 1″ spade bit used for cutting wood. It was brand new, and I decided it was worth it to ruin it cutting through the metal front of the fridge. I’ll pour out a little grease next time i’m in the shop for my  fallen homie “spayde Bitt”

Some AFX tests

Here are some recent tests I did with vector line effects in After Effects.
This first one is from a tutorial I found by bill O’neil on the creative cow site using the shine plugin.


This is the simplest one, cloning out the tracing effect once I liked it, and tweaking to add depth.


This one adds a camera move spinning the logo.


This one uses camera moves through the logo.

another person’s take on CNC

I’m going to try to avoid being one of those blogs that only links to other blogs. That whole idea seems really recursive and redundant to me. This post did interest me however. Here Stuart McFarian is building a (probably) slower machine that looks a bit less heavy-duty. It also looks like it will cost a bit less and is smaller. Regardless, I like the idea, so here it is, in all of it’s instructables glory..


http://www.instructables.com/id/EBZ3QQVF3HY3SL2/?ALLSTEPS

CL350: rolling chassis

rolling chassis at last!

I think my shit eating grin and the fact that the bike is missing about 200 pounds of parts ought to say that this has a long way to go, but I’m excited about every step.

This is my CL350 that I am rebuilding with a friend. We have cleaned and honed the cylinders, stripped and epoxy painted the frame, and are currently working on putting in new rings and then putting the engine in. Every step seems to be blocked by two or three tiny insignifigant steps, but I guess that’s just how things go when you’re working on a bike that’s almost 40 years old.

illiterates will love this one!

…so i hooked up my camera and uploaded some photos…

closeup of xylotex controller

this is a closeup of the xylotex controller

this is an earlier version of the frame

this is an earlier version of the frame from when I wanted a smaller machine.

this is the current version of the frame

this is the bigger, newer version of the frame, 4 feet by 2.5 feet! I have the black pipe installed with the leveling setups, as well as the x axis rod and bearings.

Below are a bunch of other views and closeups.

this is the current version of the frame

this is the current version of the frame

this is the current version of the frame

Links to check out

here are a few links you might find interesting if you’re doing what I’m doing.
http://www.cnczone.com/ THE forum to check out what others are doing like this.
http://www.geckodrive.com/ Pretty nice stepper controllers. Pricey, but very niceby all reports.
http://www.smallparts.com/ Exactly what the name implies. all kinds of small part you would otherwise have to dig around in dumpsters for.
http://www.dumpstercnc.com/ Obviously you know where there name comes from.
http://www.homeshopcnc.com/
http://www.hobbycnc.com/

Parts list (AKA why I’ve been eating ramen and coffee)

So here are the bits I’ve bought already


Xylotex
3 axis system kit with 425Oz/in stepper motors


Xylotex kit


enco
12′ of 1/2″ acme rod
8 matching nuts


thebigbearingstore.com
6 1/2″ 2 bolt pillow block bearings
8 1/2″ shaft collars


Home Depot
Tons of bolts, nuts, washers, bits and doodads.
20′ of galvanized steel u-channel (not really sure what to call this stuff)
specialized u-channel bolts, nuts and spacers
aluminum angle iron
1/2″ black pipe for x axis


Don’t remember.com
lovejoy couplers for motor shaft to acme rod


As far as buying things goes, I think I might be mostly done. I can foresee buying
drawer slides for the z axis,
a trim router,
and the black piping for the y axis
I might need to buy some more skate bearings at some time…who knows…